 "Rebecca " A
1/8th Scale S.R. Pullman Car
"Rebecca " A
1/8th Scale S.R. Pullman CarWORTLEY TOP FORGE MODEL ENGINEERS
"Rebecca " A
1/8th Scale S.R. Pullman Car
PART II
MAIN BODY MATERIALS
Learning from the experience of my first "big" project, (the aforementioned 2-BIL EMU), I again decided that sides, ends, floor, and internal partitions would be made from 6mm marine plywood. This had been chosen as being most suitable for applications where the worst of Yorkshire's weather would be experienced. Even if the train was stored in an enclosed shed, temperature extremes and dampness might wreak havoc with any lesser form of ply. After two years, there is still no sign of dampness, warping or other weaknesses in the 2-BIL.
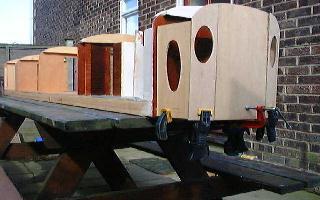
THE FLOOR The floor was cut to size from the marine ply sheet, not forgetting that the outer ends need to reflect the slightly strange shape of the traditional Pullman ends. The positions were carefully marked out for the interior walls, (kitchen, pantry, toilets, coupé and dividing walls) and partitions. A sub-floor framework of 2”x1” timber was glued and screwed in place to give stability and help prevent any tendency in the floor itself to warp. The 2”x1” also provides a substantial surface to screw the sides and ends to later on.
THE SIDES, ENDS and INTERNAL WALLS
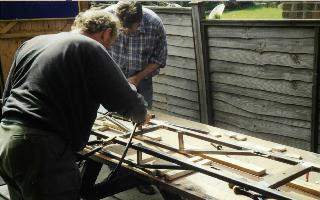
Two strips of the ply were cut slightly oversize and the sides marked out. All windows were marked out with square corners at first, and then carefully drilled to give the approximate radius of the curved corners where appropriate. Unlike the 2-BIL where additional strength and straightness could be provided by the presence of individual compartments, giving a sort of honeycomb effect, the Pullman Car was of open saloon design with just three cross-partitions. These therefore need to be fairly robust and so these, together with an additional one at each end of the main body area were cut with the correct roof profile and deep enough to fit through slots in the floor and then glued and screwed to 2"x1" cross bearers under the floor. Sections were removed to allow the subsequent insertion of glazed doors. At the top of each partition, additional 2x1 sections were glued and screwed to enable the roof section securing bolts to be held in place. The sides were then fixed in place to the sub-frame, and strips of beading glued to form a strengthening fillet between the sides and each internal wall. Once everything looked right, attention turned to the ends.
 Internal walls and the outside ends clamped in
place
Internal walls and the outside ends clamped in
place
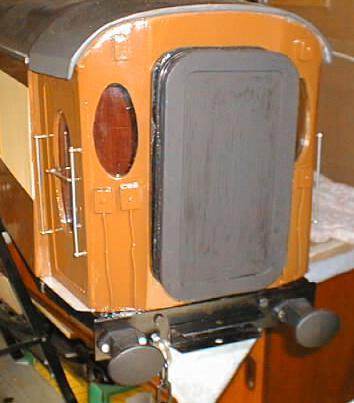
THE ENDS End details, such as the electrical boxes were made from scrap wood, lengths of wire and then glued and screwed in place, while the corridor connections were made up of a sandwich of plywood and sponge-filled plastic sheet as used on car fascias and interiors. This not only gives the right ‘look and feel’ but also allows a degree of compression - just like sprung buffers, everybody seems to want to “push it to see if it moves”! The doors were adorned with handrails from steel rod held in place by 5” gauge loco handrail knobs and door handles from filed metal rod. The actual entry steps were fashioned from chequer-plated aluminium.
THE ROOF The roof for each coach was fabricated from fibre-glass. A fellow member at the Wortley Top Forge Model Engineers volunteered to supply these, in any length sections required, and their use on the 2-BIL bore suitable testimony of the look and strength of this form of roofing. To the purist, the profile of the roof is actually wrong for a Pullman but the prospect of trying to build a properly shaped roof any other way did not bear thinking about! Like the 2-BIL, I had planned to keep the roof plain to enable passengers to sit astride. However, to date, everybody I've spoken to has made it clear that it would be lunacy to allow riders due to the damage which would be done to the coach from shoes and boots kicking against the sides! nevertheless, I have still not added ventilators or other detail to the roof ......... yet!
THE
UNDERFRAME
 The
underframes were made from box section mild steel and welded up by a friend
using an old door as a means of holding the various steel parts together and in
line. They were then thoroughly cleaned up and painted using Hammerite black.
Holes were drilled in the underframes and the inside of the coach bodies, and
the two parts united with heavy duty nuts and bolts. The underframe is not a
true replica of the protoype, but by using the conventional design of trusses
under the solebars, this gives something for the coach to stand on when not
mounted on its bogies - and it looks OK so I'm happy with
it!
The
underframes were made from box section mild steel and welded up by a friend
using an old door as a means of holding the various steel parts together and in
line. They were then thoroughly cleaned up and painted using Hammerite black.
Holes were drilled in the underframes and the inside of the coach bodies, and
the two parts united with heavy duty nuts and bolts. The underframe is not a
true replica of the protoype, but by using the conventional design of trusses
under the solebars, this gives something for the coach to stand on when not
mounted on its bogies - and it looks OK so I'm happy with
it!
BOGIES
Like the underframe, the bogies are not accurate but instead are based on the tried and tested design we developed at Wortley Top Forge and have stood the test of time on the 2-BIL and some of our other coaching stock. At least the wheelbase and the wheels are scale!